Tuesday, October 7, 2008

SSH to tether your iphone with OpenVPN over USB cable

With appearance of PdaNet for iphone the connection of your PC to the Internet through the iphone (tethering) turns into a trivial task. You only need to arrange ad-hoc wifi connection between your PC and iphone and forget about all socks, proxy, tunnels etc. PdaNet turns your iphone into a wireless router giving you FULL Internet access on the computer for all protocols/ports/services you need.

In this post I'll try to show how to reach the same functionality connecting your PC to the iphone over cable with the help of OpenVPN. Why OpenVPN? Because it is the only vpn suite which can use TCP protocol and one port for connection. That's why we can arrange ssh local tunnel to link the PC with external vpn server over iphone's GPRS/EDGE/3G.
OpenVPN is a great cross-platform freeware and open source program for creating virtual private network (VPN) between computers. I found some original guides in linux guru blogs (here and here) so my idea is only to repeat the same tricks for Windows.
We need two PCs, one is a laptop to be tethered where we'll install openvpn client. Another machine is home or small-office PC connected to broadband Internet line and to be configured as openvpn server.
The main idea of VPN is gaining secure access to the intranet shared resources, company internal web-site or mailserver over fast Internet line through encrypted tunnel between client and server hosts. In addition, vpn-server can be a kind of "router" for the remote vpn-client giving full Internet access to it. Typically it's not needed because vpn-client is already in the Internet and gains only access to the private resources at the server's LAN. But in our case it is essential, the laptop will be connected to the vpn server over GPRS/EDGE/3G and get full Internet access from it. All requests will be wrapped into openvpn tunnel which in turn will be wrapped into ssh tunnel between ssh-client, the laptop, and ssh-server, the iphone. Sounds complicated? Let's see.
First, we need to install and configure our openvpn hosts. The latest release version of openvpn is 2.09, you can download it from official page at http://www.openvpn.net/index.php/downloads.html, there is GUI interface for Windows at http://openvpn.se. Besides, the new openvpn version 2.1 (pre-release is available) supports Vista and contains GUI already inside. I experimented with this pre-release version on my Vista Home Premium laptop connecting it to my office openvpn 2.09 server without problem.
The installation is rather easy, one extra tun/tap pseudo network adapter is added to each system. This adapter will be used for point-to-point connection, it is fully controlled by openvpn so don't touch it at all.
Assume we have openvpn server with fictitious address remote.vpn.com somewhere in Internet. This server has two real Ethernet adapters. One is for external connection, another is part of small-office LAN within 172.29.10.x range, this LAN adapter address is 172.29.10.10, the third "adapter" is openvpn MyTap. So server's Network Places look like this (ignore Incoming connections here):

In order to provide the Internet access for MyTap adapter, i.e. for vpn-client, we will enable Internet Connection Sharing on External Connection for MyTap adapter

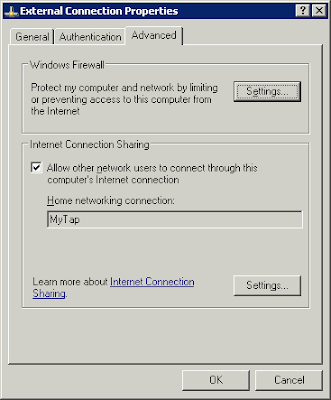
and disable the Windows Firewall on MyTap adapter

We need to prepare and tune up ovpn configuration file, one on laptop, another on server, samples are stored in sample-config subdirectory. So just copy client.ovpn from sample-config to config subdirectory on laptop, do the same for server.ovpn on your server. Note that openvpn is rather sensitive for config files changes so please modify them if you know what you do.
For both config.ovpn and client.ovpn it is essential to have:

# Are we connecting to a TCP or
# UDP server? Use the same setting as
# on the server.
proto tcp
;proto udp


and

# "dev tun" will create a routed IP tunnel,
# "dev tap" will create an ethernet tunnel.
# Use "dev tap0" if you are ethernet bridging
# and have precreated a tap0 virtual interface
# and bridged it with your ethernet interface.
# If you want to control access policies
# over the VPN, you must create firewall
# rules for the the TUN/TAP interface.
# On non-Windows systems, you can give
# an explicit unit number, such as tun0.
# On Windows, use "dev-node" for this.
# On most systems, the VPN will not function
# unless you partially or fully disable
# the firewall for the TUN/TAP interface.
dev tap
;dev tun


For client.ovpn we use 127.0.0.1 for ssh tunnel connection, not real server address here.

# The hostname/IP and port of the server.
# You can have multiple remote entries
# to load balance between the servers.
remote 127.0.0.1 1194


For server.ovpn we need to append (highlighted in blue) the following section:

# If enabled, this directive will configure
# all clients to redirect their default
# network gateway through the VPN, causing
# all IP traffic such as web browsing and
# and DNS lookups to go through the VPN
# (The OpenVPN server machine may need to NAT
# the TUN/TAP interface to the internet in
# order for this to work properly).
# CAVEAT: May break client's network config if
# client's local DHCP server packets get routed
# through the tunnel. Solution: make sure
# client's local DHCP server is reachable via
# a more specific route than the default route
# of 0.0.0.0/0.0.0.0.
push "redirect-gateway def1"


and these

# Configure server mode and supply a VPN subnet
# for OpenVPN to draw client addresses from.
# The server will take 10.8.0.1 for itself,
# the rest will be made available to clients.
# Each client will be able to reach the server
# on 10.8.0.1. Comment this line out if you are
# ethernet bridging. See the man page for more info.
;server 10.8.0.0 255.255.255.0
server 192.168.0.0 255.255.255.0


# Certain Windows-specific network settings
# can be pushed to clients, such as DNS
# or WINS server addresses. CAVEAT:
# http://openvpn.net/faq.html#dhcpcaveats
push "dhcp-option DNS 192.168.0.1"
push "dhcp-option WINS 192.168.0.1"


At this point we consider openvpn configuration finished. I intentionally skip the important part of secure keys generating. It is described in details in hundreds of online openvpn manuals and guides. Remember, you must generate client keys on server console and then transfer them to client for further use.

Let's return to our ssh-client on laptop and configure Tunnelier (which we so successfully used before) to arrange the only one C2S tunnel. Please disable any other options which we used before for socks-proxy and mail tunnels (see my older posts). Now we have only this entry in C2S Forwarding screen:

where remote.vpn.com is our openvpn server address in the Internet and 1194 is port OpenVPN uses.
We connect the iphone to the laptop with USB cable, check ssh is ON in iphone's Bossprefs, change auto-lock to Never and start Runtunnel.cmd on laptop to enable itunnel (see my older posts). Make sure the GPRS/EDGE/3G is available on the iphone and press Login in Tunnelier.
If ssh connection is OK you can start openvpn client connection. Use OpenvpnGUI icon in tray to start openvpn session. If it's successful the laptop's tap-adapter will get 192.168.0.2 from openvpn server which according to ICS main rule keeps 192.168.0.1 for itself.
The server provides full NAT (network address translation) for client's requests wrapped into openvpn tunnel. Then the client gains FULL Internet access directly, now without any changes in its browser/mailer/im configuration. You can easily start, for instance, ftp-session or mail client or RDP in your notebook without any extra preparations. Moreover, after openvpn you can even start PPTP/L2TP/IPSec vpn connection with some third-party vpn-server which was not possible before because of ssh limitation to serve TCP protocol only.
As a result, we have encrypted and compressed openvpn tunnel between laptop and soho server on TCP port 1194 and get FULL Internet access for laptop over GPRS/EDGE/3G provided by iphone!

Saturday, August 9, 2008

SSH to get your iphone online via USB cable

This manual is based on the ideas and guides first presented here in Russian and agreed with the author.

In previous manual I have described how to connect your PC to GPRS/EDGE Internet provided by iphone via USB cable. This outstanding result achieved with the help of small utility called iTunnel.exe from Iphone Tunnel Suite released recently. SSH protocol is used to provide the connection between the PC and the iphone.

Now I will try to explain another way of communication the iphone can use. We will connect it to the Internet-connected PC via standard USB cable and get the iphone online in this passthru, reverse mode. Without wifi, without GPRS/EDGE fee to GSM operator. Incredible, impossible? Read further...

The PC:
iTunes should be installed on the PC (UPDATE: iTunes 8.2/9 should be used for iphone OS3.x), moreover you may need .NET Framework 3.5 to be installed in order to make it work. By the way, I managed to start it on Vista Home Premium SP1 with its native .NET Framework 3.0. Iphone Tunnel Suite is not needed. Instead you need to download only a core part, the iTunnel.exe, one supplementary dll (iTunesMobileDevice.dll) and startup cmd-file. The link to itunnel.zip is below:
http://www.mediafire.com/?tnaqjzw0mnd - for OS2.x
http://www.mediafire.com/?tlmdkorzmyq - for OS3.x (iTunesMobileDevice.dll from iTunes 8.2)
http://www.mediafire.com/?2q1fzowoy12 - for iTunes 9 (iTunesMobileDevice.dll from iTunes 9)

For ssh access I am going to use Bitvise Tunnelier but you can try any ssh client you like. In particular, Tunnelier Portable is excellent GUI ssh client with clear interface and good help file. It doesn't need to be installed on the computer and can be started even from USB flash drive. Download it from here:
http://tp.vbap.com.au/download

The iphone:
You must have OpenSSH installed on the iphone. I recommend to have Bossprefs as a toggle tool in order to enable SSH server and for some other tricks below. Disable wifi to avoid any interference.
Make sure your gprs/edge settings (APN etc.) are entered in the iphone and it reliably works over gprs/edge. We need it only to be sure that gprs/edge network interface is OK.

1-4. The first three steps are the same as in previous post. Extract TunnelierPortable and itunnel.zip if didn't do it before, locate Runtunnel.cmd and be ready to start later. Start TunnelierPortable.exe, if you save your profile before, the program will autoload it after start. Check settings according to the following screens, some of them need to be changed.

Login - enter 127.0.0.1 into the Host field, the Username is root, the initial method is "password". The password is alpine (if you didn't change it). You can store the encrypted password in the profile if you like.
For better security you can use key pairs for authentication but this item is out of current guide, see ssh manual for details or wait for my further posts on it.

Options - notice two check boxes at the top right corner. Enabling "Open Terminal" and "Open SFTP" you can use internal Tunnelier Terminal and SFTP client (WinSCP-like) to access the iphone after the connection.
I recommend you to enable them both now, you may need them later.
* * *
Services - in previous post it was important option to enable socks-proxy on the PC. Now we don't need this option. Please uncheck SOCKS/HTTP Proxy Forwarding on the Services screen if it was Enabled before.
* * *
Client to Server Forwarding - if you have any entries here (left from previous exercise) disable or delete them on this screen. Later you can save settings in a new profile making previous profile intact and keeping all your socks and C2S entries.

And finally:
Server to Client Forwarding - the most important new screen in this guide. It contains entries for so called reverse port forwarding (-R in OpenSSH) through the ssh tunnel. This is the most incredible point in the huge list of ssh protocol capabilities. Let me explain it briefly. In prevoius guide and in this one the PC is ssh client while the iphone is ssh server. After the connection between them ssh allows not only reach some external sites through the forwarded ports from client to server but in the reverse direction, from server to client too. It means that if our PC acting as ssh client is connected to the external network (via Ethernet or wireless connection) the ssh server will be able to reach client's network too. Unfortunately, this can not be made directly, for any of this connection we should provide the "reverse tunnel" between client and server.
OK, what should be done for iphone?
We need http proxy for all http-based native iphone applications. If you don't have proxy server in your LAN you need to install some personal and easy to configure proxy server on your PC. I recommend privoxy (www.privoxy.org), it is free open-source proxy server well-known with its good ad-blocking filters. Installation is straight-forward, privoxy is ready to use immediately after setup is finished.
Start it, you will notice blue circle with P in your tray. Double click on it will open main privoxy window. Optionally you can make privoxy to be more informative. To change its config choose Options/Edit main configuration, privoxy will open it config.txt, find section 3.1 debug and uncheck this part in it:
debug 1 # log each request destination (and the crunch reason if Privoxy intercepted the request)
debug 4096 # Startup banner and warnings
debug 8192 # Non-fatal errors
Save config.txt, privoxy will accept changes immediately. It will give you more information in Privoxy window when connection will be made. The default http port it uses to serve client's requests is 8118.
Let's return to S2C Forwarding screen, you may notice that its first entry prepares the tunnel to provide the requests from the iphone to the PC over port 8118. Then we have another issue.
How to force the iphone to use http proxy on its primary, gprs/edge interface?
There is no menu in iphone settings to change it (unlike the wifi), it is not documented but it is possible.
The trick is to change the iphone's preferences file in the following location.
/private/var/root/Library/Preferences/SystemConfiguration/preferences.plist (for 1.1.1 firmware)
or
/private/var/preferences/SystemConfiguration/preferences.plist (for 1.1.3 or higher)
The recommended way is to copy this file from iphone to your PC using sftp-interface of Tunnelier (see later), modify it with some text editor, for instance Wordpad, save, check the name of the modified file doesn't contain .txt ending and copy it back to the iphone.
What should be modified in preferences.plist? You need to add section responsible for using proxy autoconfiguration file there. Locate the part shown below and append it with a text in blue color:

<dict>
<key>Interface</key>
<dict>
<key>DeviceName</key>
<string>ip1</string>
<key>Hardware</key>
<string>com.apple.CommCenter</string>
<key>Type</key>
<string>com.apple.CommCenter</string>
<key>UserDefinedName</key>
<string>com.apple.CommCenter (ip1)</string>
</dict>
<key>Proxies</key>
<dict>
<key>ProxyAutoConfigEnable</key>
<integer>1</integer>
<key>ProxyAutoConfigURLString</key>
<string>file:///private/var/preferences/proxy.pac</string>
</dict>
...some more entries which we don't touch

In this file we add the link to proxy autoconfiguration file proxy.pac in /private/var/preferences directory on iphone. The file contains proper address for the proxy server.
When the iphone is connected to the PC via USB cable proxy.pac must be:
function FindProxyForURL(url, host)
{
return "PROXY 127.0.0.1:8118"; }

If you need to get access to gprs/edge outdoors proxy.pac must be just:
function FindProxyForURL(url, host)
{
return "DIRECT"; }

Update: Starting from fw 2.2 you don't need to switch back to "DIRECT" in proxy.pac. I noticed that Safari and other http-based iphone applications start working over GRPS/EDGE again if there is no cable connection despite the proxy.pac remains with PROXY 127.0.0.1 inside. So the rest of section 1-4 (EdgeProxy plugin etc.) could be easily skipped to section 5 and kept here for historical reasons only. Anyway, if you prefer to switch proxy mode on and off you, sure, can use the method described below.

To simlify the task I have already prepared these files for you. Download edgeproxy.zip from here
http://www.mediafire.com/?ymkdc9zmjjh
In addition, I have made the plugin for BossPrefs 1.73 allowing to toggle proxy.pac thru BossPrefs interface.
Please find detailed manual in the Readme.txt inside.


Note the archive doesn't contain proxy.pac directly, but only two pattern files: proxy.edge and proxy.off.
Enabling EdgeProxy ON should copy proxy.edge to proxy.pac, create signal .pid file and REBOOT the iphone in few seconds to enable proxy settings. After restart BossPrefs will show you the right status of the EdgeProxy. So now the iphone is ready for connection via USB.
When you need to disable proxy start BossPrefs again and flick the EdgeProxy OFF. BossPrefs will copy proxy.off to proxy.pac, remove .pid file and REBOOT the iphone to make changes.
On my 1.1.1 firmware everything is working fine. I am not sure it will be so easy on more newer versions because of changes (user mobile) in BossPrefs execution of plugin commands.
Update: Everything is OK here with 2.0.2 iphone and latest Bossprefs. So please use the plugin.
Anyway, you know that through the Tunnelier Terminal connection (started with root credentials) you can make some copy commands manually or just prepare simple .sh scripts to automate the task.
See my scripts here as an example of those scripts.
OK. Now everything is ready to start.

5. Connect the iphone to the PC with standard USB cable, be sure that SSH server is enabled on the iphone. Be sure your PC is connected to the Internet.
6. Launch the Runtunnel.cmd mentioned above. If you didn't start it before notice Windows Firewall warning and add iTunnel to the exceptions list. You will see the black console window contains nothing except the itunnel.exe 22 22 command. Do NOT close this window, it should stay opened during the whole connection session, later you will notice some messages there proving that tunnel is working.
7. Press Login button in Tunnelier. First time the client will ask you to accept the host key from ssh server (your iphone). Accept it and look at the Tunnelier lower pane for log of the connection. If you enable Terminal and SFTP check-boxes Terminal and SFTP client windows will be opened.
You can use SFTP to copy preferences.plist forth and back to arange proxy access if you didn't do it before. You can use Tunnelier Terminal to execute commands to replace proxy.pac if BossPrefs failed to do it.
If everything is fine with preferences.plist and proxy.pac after the ssh connection you can start Safari on your iphone. Safari should start working over proxy server on our PC, you can see some entries in privoxy main window if you enable extra debugging options in privoxy config above. It means that our goal is reached! Open http://2ip.ru or http://www.whatismyip.com in Safari to make sure that your ip address is the same as on your Internet-connected PC. Try other iphone applications - Weather, Stocks, Maps, YouTube, iTunes, Cydia. Anything that use http to access will be forwarded thru reverse tunnel from ssh-server to ssh-client and appears as local proxy request to the privoxy proxy server. Fine. Our wildest dreams come true!

In addition, if you have some other proxy server in your LAN, for instance, in your office you can connect the iphone to it directly. In this case you don't need privoxy. Assuming this proxy server address is 192.168.0.10 and port 3128 we can change our S2C settings as shown below.

Now we put 192.168.0.10 in Destination host field and 3128 in Destionation Port. All requests from the iphone to LAN proxy server will look like the requests from your PC so you don't need extra permissions.

Well, but what about Mail? It doesn't use http for access. Look at the S2C Forwarding screen again, two additional entries are two additional reverse tunnels to provide access to gmail imap and smtp servers. If you use another mail providers please change the Destination host and port accordingly. The only drawback is that you need to change Mail settings in the iphone menu, so instead of real mail server name or ip address you should enter 127.0.0.1. In my gmail example it should look like this:

Please note that if you do not change settings for email accounts Mail will still be working over gprs/edge wasting operator's traffic despite the iphone is connected to the PC via USB cable.
If you use some other native iphone applications that should be connected over their own ports please add extra entries in S2C Forwarding screen with Destination Host and Port used by these applications. In configuration of the application don't forget to choose 127.0.0.1 as its server address in order to tunnel the connection from telephone to computer via USB cable. Remember, ssh can tunnel TCP-based connections only.
OK, the long guide is finished, it was longer than I thought before start. I hope you managed to fulfill the mission. If not please check back all settings, screenshots and files. Don't be hurry. Try again and you will get it as I am.

If you have question, remarks or additions feel free to apply it to me by email. I will try to help.

Wednesday, August 6, 2008

SSH to tether your iphone over USB cable to get your PC online

This manual is based on the ideas and guides first presented here in Russian and agreed with the author.

The goal is to connect your Windows PC to the Internet over iphone's GPRS/EDGE via USB cable.
The PC:
iTunes should be installed on the PC (UPDATE: iTunes 8.2/9 should be used for iphone OS3.x), moreover you may need .NET Framework 3.5 to be installed in order to make it work. Iphone Tunnel Suite is not needed. Instead you need to download only a core part, the iTunnel.exe, one supplementary dll (iTunesMobileDevice.dll) and startup cmd-file. The link to itunnel.zip is below:
http://www.mediafire.com/?tnaqjzw0mnd - for OS2.x
http://www.mediafire.com/?tlmdkorzmyq - for OS3.x (iTunesMobileDevice.dll from iTunes 8.2)
http://www.mediafire.com/?2q1fzowoy12 - for iTunes 9 (iTunesMobileDevice.dll from iTunes 9)

For ssh access I am going to use Bitvise Tunnelier. In particular, Tunnelier Portable is excellent GUI ssh client with clear interface and good help file. It doesn't need to be installed on the computer and can be started even from USB flash drive. Download it from here:
http://tp.vbap.com.au/download

The iphone:
You need to have OpenSSH installed and optionally some of the "toggle" application like Bossprefs, Netservices or Services in order to enable/disable SSH server. Disable wifi to avoid any interference.

1. Start TunnelierPortablev1.1.4.26.paf.exe and extract its content to some directory, for instance, C:\PortableApps\TunnelierPortable
2. Extract itunnel.zip to the same directory.
3. Find Runtunnel.cmd file here and be prepared to start it later. This batch file has only one command inside
itunnel.exe 22 22
which will do the trick. This console application builds a "port bridge" between the iphone port 22 and the same port on the PC.
4. Start TunnelierPortable.exe and tune it up according to the following screenshots.

Login - enter 127.0.0.1 into the Host field, root as login, choose for initial method "password" and enter the root's password below. You can store the encrypted password in the profile if you like.
For better security you can use key pairs for authentication but this item is out of our guide, see ssh manual for details.

Options - notice two check boxes at the top right part. Enabling "Open Terminal" and "Open SFTP" you can use internal Tunnelier Terminal and SFTP client (WinSCP-like) to access the iphone after the connection.
Disable any of them if you don't need them opened.

Services - an excellent feature of Tunnelier to arrange local socks-proxy server on the PC (the same as -D key in OpenSSH) to provide access for any socks-aware client applications on your PC.
Notice the port is 1080, you can change it here but don't forget to change it in your client socks configuration later.

Client to Server Forwarding - this screen is optional and contains three sample entries to show how to make local port (-L in OpenSSH) tunneling for non socks-aware applications. For example, Gmail imap/smtp access for Outlook Express is shown. Additionally, Remote Desktop connection to some fictitious remote.pc.com site is displayed, note the local port number is chosen not to be the same as local listening RDP port if it's enabled on your PC.
OK, now Tunnelier is prepared for connection, you can save the profile for future use if you like.
5. Connect the iphone to the PC with standard USB cable, be sure that SSH server is enabled on the iphone.
6. Launch the Runtunnel.cmd mentioned in point 3. Notice Windows Firewall warning and add iTunnel to the exceptions list. You will see the black console window contains nothing except the above command. Do NOT close this window, it should stay opened during the whole connection session, later you will notice some messages there proving that tunnel is working.
7. Press Login button in Tunnelier. First time the client will ask you to accept the host key from ssh server (your iphone). Accept it and look at the Tunnelier lower pane for log of the connection. If you enable Terminal and SFTP check-boxes Terminal and SFTP client windows will be opened allowing you to interact with iphone.
The connection is made. Now you need only to tune up your Windows applications to get access to the Internet over ssh tunnel.
Mozilla Firefox/Thunderbird should be set to use localhost socks5 proxy server according to the following screen:

If you have some more socks-aware applications tune them accordingly.
In addition, you need to change some advanced settings in Mozilla applications for proper DNS resolution.
Open about:config in Firefox (type this in the address in new tab) to start Advanced configuration and find the following string
network.proxy.socks_remote_dns and double click on it to change its value to true
The same trick should be made in Thunderbird, to access Advanced Configuration choose Tools/Options/Advanced/General and click on Config Editor...
Unfortunately, the iphone DNS resolver works rather strange and buggy, so you may experience some troubles with opening of popular web-sites like yahoo.com or google.com - in order to force the iphone resolver I recommend you to open them in the iphone's Safari before. Immediately after opening in the iphone this site will be available in Firefox too. Some IM applications may be configured to use ip-address instead of server's name to connect.
Alright, we've got the PC connected to the iphone via USB cable, packets are transfered over the ssh tunnel between the computer and the iphone. The iphone is connected to the Internet over GPRS/EDGE/3G so we have it on the PC for socks-configured clients. You can open some diagnostic sites like 2ip.ru to be sure that your ip-address is from the pool of your iphone GSM operator.
How to get access for any other applications (remember, ssh works only with TCP).
For instance, Outlook Express can not use socks, so we arrange two extra tunnels for it (see C2S Fwd screen). The only thing we need is to guide OE to connect not to the original smtp/imap servers but to localhost (127.0.0.1) on the same port as the Gmail servers use. To simplify the task and keep the OE servers settings untouched you can modify Windows hosts file adding the strings like this into it:
127.0.0.1 imap.gmail.com
127.0.0.1 smtp.gmail.com
Finally, to access Remote Desktop of our sample remote.pc.com site over EDGE you need to start Remote Desktop Connection on your PC and enter the following address in the Computer field:
127.0.0.1:33890
In this case your PC will be connected to the remote site in Internet over the third sample tunnel.
Voila! The small iTunnel.exe application (don't forget to look at its black window) helps us to tether with iphone and connect the PC to the Internet world. And we managed to do it without wifi!!

In the next post I will explain how to succeed in the opposite case - to connect the iphone via the USB cable to your Internet-connected PC in passthru mode. Be patient and stay tuned...